

A feedwater pump trips. The boiler loses its feed. Your maintenance crew scrambles. Nine times out of ten, the mechanical seal is the culprit. And nine times out of ten, that seal failed because of how it was put in.
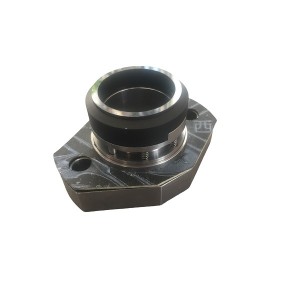
The FK5G32M is a mechanical seal built for boiler feedwater pumps. Hot water. High pressure. The fluid is boiler feedwater—and that stuff does not lubricate. It’s thin. It doesn’t form a proper film between the seal faces. So the faces run nearly dry. They wear out fast. Faster than seals in oil or coolant services by a long shot.
That alone makes this seal a challenge. But installation errors make it worse. Poor installation is the number one cause of early failure. Let’s talk about how to cut those errors down and get some real life out of this seal.
Why This Seal Is Tougher Than Most
Think about what you’re pumping. Boiler feedwater is not like water from the tap. It’s hot—often over 150°C. Viscosity is low. The water doesn’t cling to surfaces. The seal faces need a film to keep them apart. No film means they touch. Friction generates heat. Faces overheat. Wear accelerates.
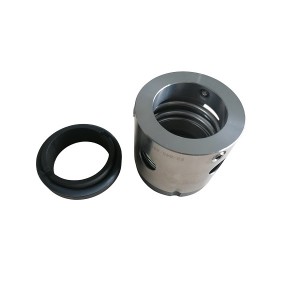
The FK5G32M uses carbon faces running against silicon carbide or tungsten carbide. That pairing helps. It’s designed for this kind of punishment. But even the best materials can’t overcome a bad installation.
When you install it wrong, the face load changes. Spring compression might be off. The faces might not be parallel. An O-ring might get pinched. Any of these things cause uneven contact. Hot spots form. Cracks show up. The seal starts weeping. Then it leaks big time.
What Goes Wrong: The Usual Suspects
These are the mistakes we see again and again. Every single one is avoidable. Every single one costs you time and money.
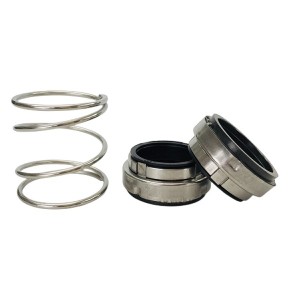
Spring compression. The seal has a spring or a bellows to keep the faces touching. Too much spring pressure and the faces overheat. Too little and they lift off, letting fluid through. The manufacturer gives you a specific compressed length. Some mechanics just guess. Don’t guess. Measure it. Use a depth gauge. Record the number.
Dirty faces. The sealing faces need to be spotless. A fingerprint can cause sticking or uneven wear. A speck of dust embeds in the softer face and acts like sandpaper. The seal runs for a few hours, wearing a groove, then gives up. Clean the faces with a lint-free cloth and the right solvent. Use gloves. Never touch the lapped faces with bare fingers.
Alignment. The seal spins with the shaft. If the shaft wobbles—runout—or the seal isn’t centered in the housing, the faces wobble too. That wears them unevenly. Check shaft runout before you start. Check the housing bore for squareness. Shim if you have to. The FK5G32M comes as a cartridge in some versions, which helps. But a cartridge still needs a straight shaft.
Gland bolts. The gland holds the stationary face. Tighten the bolts evenly. Use a torque wrench. Follow the pattern. If you over-tighten, the gland distorts. The stationary face tilts. The rotating face can’t run true. It leaks. If you under-tighten, the gland moves around. That also leaks.
Wrong O-rings. The seal uses O-rings at the static joints. The water is hot. Standard nitrile O-rings get hard and crack. The seal kit should have EPDM or Viton rings. Some plants buy cheap O-rings from a hardware store. They fail fast. Always use the rings that come with the seal. Check the material label.
How to Avoid Mistakes: A Practical Approach
You can’t get rid of all human error. But you can make the process more foolproof. Here’s what works in most plants.
Get your tools together first. You’ll need a torque wrench, a depth gauge, a dial indicator, and the manufacturer’s drawing. Do not start without that drawing. It shows you exactly where to measure spring compression and what torque to use.
Clean the shaft and the housing. Get rid of all old gasket material and sealant. The shaft surface should be smooth. No pits. Look at the shaft sleeve. If it’s scratched, replace it or polish it. Scratches will cut the seal’s O-ring when you slide it on.
Lubricate the O-rings and the sleeve with a thin coat of recommended lubricant. But keep it off the faces. Faces should be dry or wetted only with the process fluid. Some guys use a water-based lubricant on the faces—check with the manufacturer first.
Set the stationary face into the gland. Press it in straight. Use a pressing tool if the drawing says so. Never hammer it. The face is ceramic—it can shatter.
Slide the rotating assembly onto the shaft. Gently. If it binds, look for burrs on the shaft. Once it’s on, set the spring compression. Measure the gap from gland to shoulder. Add or remove shims to get it right.
Tighten the gland bolts in a cross pattern. Do it in three steps. One-third torque, then two-thirds, then full. That keeps the load even.
Before you fire up the pump, do a static leak test. Fill the pump with water. Look for drips at the gland. A few drops during startup is normal—the seal needs to bed in. But if it’s pouring right away, stop and check.
Table: Tools You Need and Why
| Tool | Why You Need It | Key Thing to Check |
|---|---|---|
| Depth gauge | Measure spring length | Compare with drawing |
| Torque wrench | Even bolt tension | Cross pattern, three passes |
| Dial indicator | Check shaft runout | Less than 0.05 mm |
| Lint-free cloth | Clean faces thoroughly | No fibres or residue |
Training and Oversight: It’s About People
Tools help, but your people matter more. Too often, seal replacement gets handed to the newest guy. That’s a recipe for trouble.
Set up a dedicated team for rotating equipment. Train them on the specifics of the FK5G32M. Show them failed seals and explain why they failed. Let them see the wear patterns. They’ll learn more from that than from any manual.
Have a supervisor watch the first few installations. Check each step. Verify spring compression and torque. Sign off on a record. That record becomes part of the maintenance file.
Use a checklist. Paper form. Boxes to tick. Mechanic initials each step. Supervisor signs off at the end. It’s not bureaucracy—it’s a safety net.
Some plants take photos. A picture of the assembled seal before closing up. Compare it to a reference. That catches missing O-rings or flipped parts.
What If It Leaks During Startup?
You’ve done the install. You fill the pump. You see water dripping at the gland. Don’t panic. A little leakage during run-in is normal. But how much is too much?
Normal break-in is a few drops per minute. It should slow down as the faces bed in. After an hour, it should be almost dry. If it’s still dripping every second or two after 30 minutes, shut it down. Something’s not right.
First, check the gland bolt torque. Sometimes they loosen. Re-torque. If it still leaks, the faces may be damaged. You might have to pull the seal and inspect.
Look at the faces. Any cracks? Chips? Uneven wear? If you see damage, replace the seal. Do not try to lap faces in the field. That’s not a field job. Get a new seal.
If the faces are clean, check shaft runout again. Maybe the shaft bends under pressure. That’s a pump problem, not a seal problem. Fix the bearings or the shaft before you try again.
Making It Last Beyond Installation
A perfect install won’t save a seal in a pump that’s falling apart. The FK5G32M needs the rest of the system to behave.
Watch suction pressure. Cavitation is a seal killer. Keep feedwater temperature steady. Rapid temperature changes cause thermal shock—the faces can crack.
Monitor vibration. High vibration means bearings or impeller issues. That vibration travels to the seal. Faces chatter. Wear unevenly. Change bearings on schedule. Balance the impeller when needed.
Use the right flush plan. The FK5G32M usually has a flush or cooling plan. That keeps faces cool and washes away debris. Make sure flush flow is adequate. Check the pressure. Low flow lets solids build up and wear the faces.
Need a genuine FK5G32M mechanical seal kit? Call your pump OEM or a reputable seal distributor. Have your pump model and seal serial number ready. That way you get the correct configuration and the right O-ring material.
The FK5G32M is a solid seal. It can handle tough service. But it demands care during installation. Take your time. Train your crew. Use the right tools. Stick to the procedure. Do that, and you’ll get years of service, not months. And that keeps the boiler feed pumping reliably.
Need technical support for FK5G32M seal installation or troubleshooting? Reach out to your pump manufacturer or a qualified mechanical seal specialist. They can provide onsite training and installation verification services.
E-mail: sales@yoyik.com
Tel: +86-838-2226655
Whatsapp: +86-13618105229
Yoyik offers various types of power plants spare parts for steam turbines, generators, boilers as below:
Tôi cần thêm valve Servo 078N208E
Three way valve LXF100/1.6C/P
hydraulic accumulator NXQA-2 5/31 5-L-Y
hydraulic check valve S20A1.0
solenoid diverter valve FRD.WJA3.001
oil shut off valve K25FJ-1.6PA2
lube gear pump 2CY-45/9-1A
solenoid operated directional valve 4WE6HA62/EW230N9K4
nozzle flapper servo valve 072-1202-10
15mm stop valve KHWJ15F1.6P
Inflatable seal dome valve-DN100 P1586C-01
latching electromagnet ZYHY
MOTOR YBX3-250M-4-55KW
valve seal kit MG.00.11.19.01
floater tank float valve PY-40
solenoid relief valve M-3SEW6U36/420MG24N9K4
cooling water pump in thermal power plant YCZ-50-250C
EH oil accumulator bladder (plus seal) NXQ-A-16-20-F/Y
bladder with seal kit NXQ-A-10/10-L-Y
Accumulator NXQ A 0.63 31.5 L
Post time: Jun-17-2026
-

Epoxy Paulownia glass powder mica tape J1108
-

4.5A25 Hydrogen system brass safety release valve
-

EH oil main pump PVH074R01AB10A250000002001AE010A
-

LVDT displacement sensor DET250A
-

COPALTITE High Temperature Sealant
-

Oil filter coarse filter DR913EA10V/-W
-

WTYY series Bimetal Thermometer Temperature Gauge
-

977HP sealing oil differential pressure valve
-

Primary fan thin oil station Filter disc SPL-15
-

Gas turbine actuator filter CB13300-001V
-

Steam turbine precision filter MSF-04S-03
-

Rotation Speed Sensor probe CS-3